OS Development with RISC-V and ULX3S
This post is part of a series about operating system development. In my previous post I talked about what kind of operating system I’m personally aiming for. In this post I’m describing my development setup. Specifically, I want to write about why I chose my current setup and how the development workflow works. I hope this is useful for anyone starting out with operating system development.
RISC-V
When I started out with my current project, I had to decide what Instruction Set Architecture (ISA) to target. Credible choices these days are x86, ARM and RISC-V. All three offer all the features to build a modern OS with virtual memory and preemptive scheduling. So from that point they are equivalent, but there are large differences in the complexity and frustration you will encounter.
I’ve written about the differences of x86 vs RISC-V complexity in my RISC-V Stumbling Blocks blog post. Long story short: Everything is simpler on RISC-V compared to x86. Seasoned x86 veterans may enjoy the Page Fault Weird Machine as a case in point. Given that my goal is to stay as low complexity as possible, the choice was easy.
ARM falls somewhat in the middle between x86 and RISC-V for me and I don’t see a good reason to choose it over RISC-V, especially when starting out from scratch. Even if I eventually want to support ARM, it’s probably easier to get everything going with RISC-V and port later.
ULX3S
Since I wrote about RISC-V Stumbling Blocks, the hardware availability situation has notably improved. The different emulators are not the only choice for development anymore.
A PC-class development board, the HiFive Unmatched, has been released in 2020. It sells for around 500€. I went a bit smaller and chose the ULX3S FPGA board that sells for <200€. This board is based on the Lattice ECP5 FPGA, which has a complete open source toolchain and spares me the horrors of dealing with proprietary FPGA toolchains. Go ♡♡♡♡ yourself, Xilinx.
The ULX3S allowed me to experiment with different RISC-V SOCs, such as
LiteX and
SaxonSoc. SaxonSoc has
excellent support for the ULX3S and supports everything from HDMI to
audio output. The ULX3S community
(available on Matrix as
#ulx3s_Lobby:gitter.im) was extremely helpful in getting me
going. Prebuilt SaxonSoc bitstreams are available
here.
If you follow the instructions, you get a setup with the OpenSBI firmware and the U-Boot bootloader. Running Linux is a good way to check whether everything is set up correctly.
Fast Edit-Compile-Run
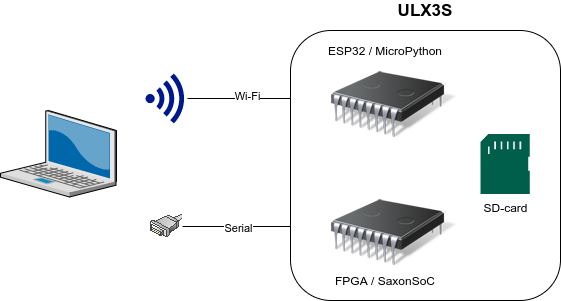
The diagram below outlines what my development setup ended up looking like after some iterations.

The ULX3S comes with an ESP32 that can connect to Wi-Fi and has access to the SD-Card on the board. It can also flash new bitstreams for the FPGA, if necessary. The ESP32 runs MicroPython and can be configured to serve the SD-Card content via FTP. I use this to push new kernel images to the card.
For debugging and logging, I use the built-in USB-serial adapter of
the ULX3S via fujprog. Serial can
connect to either the FPGA or the ESP32. I keep serial connected to
the FPGA most of the time. For interacting and initially configuring
the ESP32, a passthrough
bitstream
needs to be loaded to route serial to the ESP32 instead of the
FPGA. This can also be done via fujprog:
# This lasts till the board is power-cycled.
% fujprog -j sram < ulx3s_85f_passthru.bit
I configured the ESP32 to connect to my Wi-Fi. I then push my binary with this Python script to the board:
#!/usr/bin/env nix-shell
#! nix-shell -i python3 -p python3

import sys

IP=sys.argv[1]
FILE=sys.argv[2]

from ftplib import FTP

ftp = FTP(IP)
ftp.set_debuglevel(1)
ftp.set_pasv(False)
ftp.login()

# Ask the ESP to mount the SD card as /sd.
ftp.sendcmd("SITE mount")

try:
    with open(FILE, 'rb') as f:
        ftp.storbinary("STOR /sd/epoxy.elf", f)
finally:
    # Clean up so U-Boot can access the card as well.
    ftp.sendcmd("SITE umount")
I copy my kernel as epoxy.elf onto the SD card. Then I configure
U-Boot to automatically boot it on power-up via the following commands
in the U-Boot shell:
# You might want to remember your old bootcmd.
=> printenv
...
=> set bootcmd "load mmc 0:1 0x80000000 epoxy.elf;  bootelf -p 0x80000000"
=> saveenv
mmc 0:1 is the SD card device and 0x80000000 is an arbitrary free
memory location. Be sure to avoid putting the ELF file to a location
that is used by the ELF itself. Check the PhysAddr column of
readelf -l to see where it is going to be unpacked to. To find free
memory, you can look into the device tree that came with the
precompiled Linux using dtc or just check what memory Linux declared
as usable in dmesg.
The ESP32 comes up with the default hostname espressif. Pushing the
binary and watching the binary boot via serial, looks like this:
The whole workflow has a turnaround time of few seconds from editing code to running the binary on hardware and I’m pretty happy with it. I haven’t covered how I actually build these ELF files, but this will be a topic for a future blog post.